Overview
This page shows how to talk to a GPIB instrument from C#. The download contains two small programs. Both do exactly the same thing: open the instrument, ask it *IDN?, print the answer, close again. Each one is complete on its own, and either is enough to get you started.
They differ in how they reach VISA, and that is the whole reason there are two. One takes the normal .NET route through NuGet packages. The other calls the VISA DLL directly. Which one is right for you depends on what is installed on your PC, and the next section explains how to tell.
By the end you will have one of them running against your own instrument, and you will know the handful of calls needed to write your own program.
Why there are two projects
VisaNetDemo uses the VISA.NET packages. This is the way most .NET developers work with instruments. You add two NuGet packages, and after that you work with ordinary .NET objects. Errors arrive as exceptions, strings come back as strings, and there are no buffers to size.
There is a catch. VISA.NET only finds a VISA that has registered itself as a .NET provider. Installing NI-VISA or the Keysight IO Libraries does that for you. Other VISA implementations offer only the classic C functions and never register for .NET, and to VISA.NET those are simply invisible.
VisaPInvokeDemo skips all of that and calls visa64.dll directly, using the .NET feature called P/Invoke. No NuGet packages, no vendor SDK. Anything that exports the standard VISA C functions works, registered or not. The price is that you do the work VISA.NET was doing for you: check a status code after every call, and manage the byte buffers yourself.
Prerequisites
- A GPIBEE, with an instrument on the GPIB bus.
- Windows, 64-bit.
- A VISA implementation installed on the PC. See below.
- Visual Studio 2022 with the .NET 8 SDK, or just the
dotnetcommand line. See further down.
Install a VISA
VISA is the standard API between your program and the instrument. Your code says "open this resource, write this string, read the answer", and VISA handles the transport underneath, whether that is LAN, USB or a GPIB card. GPIBEE appears on the network as a VXI-11 instrument, so any VISA can talk to it.
VISA is not part of Windows and does not come with Visual Studio. You have to install one.
If you have the Keysight IO Libraries instead of NI-VISA, swap the provider package in VisaNetDemo.csproj for Keysight's. Nothing in Program.cs changes, because it only touches the vendor-neutral interfaces.
Install Visual Studio
Skip this if you already have it. Otherwise Visual Studio 2022 Community is free for individuals, open source projects and small teams:
In the installer, tick the .NET desktop development workload. That brings the .NET 8 SDK with it, which is what these projects target.
Visual Studio is not actually required. Both projects are plain SDK-style projects, so dotnet build and dotnet run work from a terminal with nothing but the .NET SDK installed. There is a command line version of the run step further down.
Download the example
Both demo projects, targeting .NET 8. VisaPInvokeDemo needs no NuGet packages at all.
Unpack it somewhere convenient. Inside:
| File | What it is |
|---|---|
VisaNetDemo/VisaNetDemo.csproj | Project file for the VISA.NET demo. Open this one in Visual Studio. It lists the two NuGet packages. |
VisaNetDemo/Program.cs | The whole program, around thirty lines. |
VisaPInvokeDemo/VisaPInvokeDemo.csproj | Project file for the P/Invoke demo. No packages, and it forces a 64-bit build. |
VisaPInvokeDemo/Program.cs | The program, plus three small helpers for write, read and status checking. |
VisaPInvokeDemo/Visa.cs | The declarations of the VISA functions that live in visa64.dll. One line per function. |
.csproj at a time, run it, and open the other if you want to compare.
Open and run a project
In Visual Studio, use File → Open → Project/Solution and pick one of the two .csproj files.
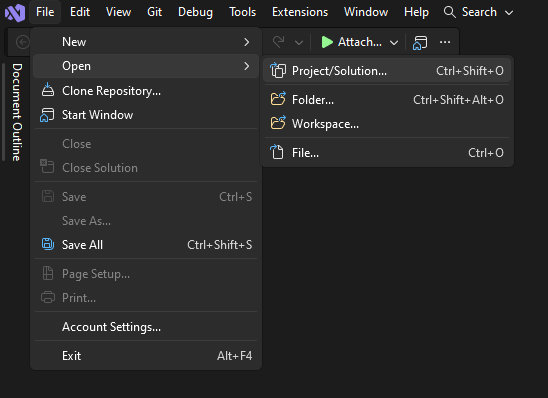
.csproj opens just as well as a solution.Set the instrument address first
Before you run anything, open Program.cs and change one line near the top to match your setup:
const string ResourceName = "TCPIP0::192.168.3.2::inst0,4::INSTR";
Read it as two parts. 192.168.3.2 is the IP address of your GPIBEE, and the 4 at the end of inst0,4 is the GPIB address of the instrument on the bus. If you are not sure of either, the GPIBEE web interface shows the IP and can scan the bus for you.
That line is the same in both projects.
Press the green button
The toolbar button carries the project name. Press it, and Visual Studio builds the project and starts it in one step. F5 does the same from the keyboard.
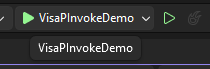
From a terminal, the same thing looks like this:
cd CSharpVisaDemo\VisaPInvokeDemo
dotnet run
What you should see
A console window opens, the instrument answers, and the program ends:
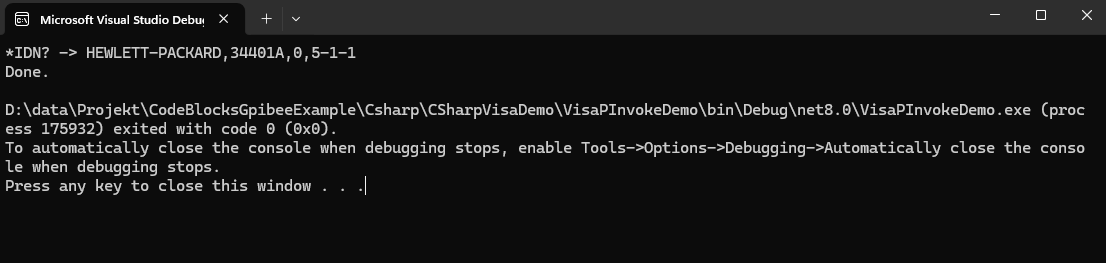
The interesting line is the first one. HEWLETT-PACKARD,34401A,0,5-1-1 is the instrument telling you its maker, model, serial number and firmware version. If you see that, every link in the chain works: .NET reached VISA, VISA reached the GPIBEE over the network, and the adapter reached the instrument over GPIB.
Exit code 0 means the program finished normally. Anything else, and the messages above it will say what went wrong.
VisaNetDemo, line by line
Two NuGet packages do the heavy lifting: IviFoundation.Visa, which is the vendor-neutral part, and NationalInstruments.Visa, which is the actual provider. Visual Studio restores both the first time you build, so you need an internet connection for that one build.
The program starts by asking the machine what VISA it has:
using var resourceManager = new ResourceManager();
Then it lists everything VISA can see. This step is optional, but it is worth keeping, because a typo in a resource name fails with the same error as an instrument that is switched off:
foreach (string resource in resourceManager.Find("?*"))
{
    Console.WriteLine(resource);
}
Opening the instrument gives you a session, which is your handle on it for as long as you need it:
using var session = (IMessageBasedSession)resourceManager.Open(
    ResourceName,
    AccessModes.ExclusiveLock,
    2000);

session.TimeoutMilliseconds = 5000;
session.TerminationCharacterEnabled = true;
The cast looks odd, so it is worth a word. Open hands back a general session, because VISA can also open things you do not send text to, such as raw register access. Instruments you send SCPI strings to are called message based, which is why you cast to IMessageBasedSession. Everything reachable through GPIBEE is message based.
TimeoutMilliseconds is how long a read waits before giving up. Raise it if you trigger a long measurement. TerminationCharacterEnabled tells VISA to stop reading at the newline the instrument sends at the end of its answer, which is what nearly every SCPI instrument does. There is more on that below, because it is the setting that catches most people out.
Then the actual conversation, which is two lines:
session.RawIO.Write("*IDN?\n");
string idn = session.RawIO.ReadString();
The using in front of both the resource manager and the session matters. Both hold real driver handles, and using is what closes them when the program leaves that block, including when it leaves because something threw.
| What you call | What it does |
|---|---|
new ResourceManager() | Finds the VISA installed on this PC. Everything else starts here. |
Find("?*") | Lists every resource VISA can currently see. |
Open(name, mode, timeout) | Opens one instrument. Cast the result to IMessageBasedSession. |
TimeoutMilliseconds | How long a read waits before it gives up. |
TerminationCharacterEnabled | End a read at the instrument's newline instead of waiting for the full buffer. |
RawIO.Write(text) | Sends a command. Include the trailing \n yourself. |
RawIO.ReadString() | Reads the answer back as text. |
VisaPInvokeDemo, line by line
This project has no packages. Instead, Visa.cs tells .NET what lives inside visa64.dll and what each function looks like. One attribute and one line per function:
[DllImport("visa64.dll")]
public static extern int viOpenDefaultRM(out uint sesn);

[DllImport("visa64.dll", CharSet = CharSet.Ansi)]
public static extern int viOpen(uint sesn, string rsrcName,
                                uint accessMode, uint openTimeout, out uint vi);
That is all P/Invoke is. You describe a function that already exists in a DLL, and from then on you call it like any other C# method. Six of them are enough for this demo:
| Function | What it does |
|---|---|
viOpenDefaultRM | Starts VISA and gives you a resource manager handle. Called once, at the beginning. |
viOpen | Opens one instrument by resource name and gives you the session handle everything below uses. |
viSetAttribute | Changes a setting on that session. The demo uses it to set the I/O timeout to 5 seconds. |
viWrite | Sends bytes to the instrument. |
viRead | Reads bytes back. |
viClose | Closes a session. Needed twice: once for the instrument, once for the resource manager. |
The program itself is the same three steps VISA always is, but nothing throws an exception for you here. Every VISA function returns a status number, and negative means it failed, so every call is wrapped:
Check(Visa.viOpenDefaultRM(out uint rm), "viOpenDefaultRM");
Check sits at the bottom of Program.cs and does the obvious thing:
static void Check(int status, string what)
{
    if (status < 0)
    {
        throw new InvalidOperationException(
            $"{what} failed, VISA status = 0x{status:X8}");
    }
}
Skipping that check is the classic beginner mistake here. Without it a failed open looks like a successful one, and the failure only shows up later as a confusing error somewhere else.
The other two helpers, Write and Read, exist because VISA works in bytes while C# works in strings. Write turns the command into ASCII bytes, and Read allocates a 4096 byte buffer, reads into it, and turns back into a string only the part that actually arrived. Raise that buffer if you expect long answers, such as a captured waveform.
Read termination
This is the setting that costs beginners the most time, so it is worth understanding before you need it.
When you read from an instrument, VISA has to know when the answer has ended. There are two ways it can find out. Most instruments assert a hardware signal called EOI on the last byte they send, and VISA always stops on that, which is why the demos work without any of this. The other way is a terminator byte at the end of the text, almost always a newline. If your instrument does not use EOI, and VISA is not watching for the terminator, the read just sits there until the timeout expires and reports an error, even though the answer arrived long ago.
So the symptom to remember is this: writes clearly work, and every read times out. That is almost always read termination, not a broken connection.
In VisaNetDemo
Two properties on the session:
session.TerminationCharacterEnabled = true;
session.TerminationCharacter = (byte)'\n';
The first one switches the mechanism on. The second says which byte to stop at, and it already defaults to \n, which is why the demo only sets the first line. Set it explicitly if your instrument ends its answers with a carriage return instead.
In VisaPInvokeDemo
Same two settings, reached through viSetAttribute. The demo does not use them, so first add the two attribute IDs to Visa.cs, next to the timeout one that is already there:
// VI_ATTR_TERMCHAR: the byte a read stops at.
// VI_ATTR_TERMCHAR_EN: whether to look for it at all.
public const uint VI_ATTR_TERMCHAR    = 0x3FFF0018;
public const uint VI_ATTR_TERMCHAR_EN = 0x3FFF0038;
Then set them right after the timeout, before the first read:
Check(Visa.viSetAttribute(instr, Visa.VI_ATTR_TERMCHAR, (byte)'\n'),
      "viSetAttribute(TERMCHAR)");
Check(Visa.viSetAttribute(instr, Visa.VI_ATTR_TERMCHAR_EN, 1),
      "viSetAttribute(TERMCHAR_EN)");
Set the character first and enable it second. Nothing new has to be declared for this: viSetAttribute is already in the wrapper, and these are just two more attribute IDs going through it.
Which terminator does your instrument use
| Instrument sends | What to set |
|---|---|
| Newline (LF) | Stop at \n. The usual case, and the default. |
| Carriage return (CR) | Stop at \r. Some older instruments do this. |
| CR then LF | Still stop at \n, because VISA matches one byte and CRLF ends in LF. You get a stray \r on the end of the string, so trim it. |
| Nothing, only EOI | Leave termination off. VISA ends the read on EOI by itself. |
If you do not know which one you have, start with \n. If reads still time out, try \r. Two attempts cover nearly everything.
One more thing worth knowing: what you send and what you read are separate. The demos put \n at the end of every command themselves, in the string passed to Write. Changing the read terminator does not change that, and an instrument that wants CR at the end of a command needs that changed in the command string too.
The one trap on 64-bit
visa64.dll. They do not get wider on a 64-bit build. The exception is the attribute value passed to viSetAttribute, which genuinely is 64-bit there. That is why attrValue is ulong in Visa.cs while everything around it is uint.
public static extern int viSetAttribute(uint vi, uint attrName, ulong attrValue);
Get that one wrong and nothing complains. There is no exception and no error code. The value simply arrives on the other side as garbage, or not at all, and you are left wondering why a timeout you clearly set is being ignored. It is worth knowing about before you add your first extra attribute.
The project file also sets PlatformTarget to x64. A 32-bit process cannot load a 64-bit DLL at all, so without that line the program would fail to find visa64.dll on some machines even though the file is right there.
Which one should you use
| VisaNetDemo | VisaPInvokeDemo | |
|---|---|---|
| Setup | Two NuGet packages, restored on first build | Nothing. Just a VISA DLL on the machine. |
| Works with | A VISA that registers itself for .NET, such as NI-VISA or Keysight | Any VISA that exports the standard C functions |
| Errors | Exceptions | A status number you check yourself after every call |
| Text and buffers | Handled for you | Your own byte arrays and lengths |
| Best when | You want the normal .NET way and have a mainstream VISA installed | VISA.NET cannot see your VISA, or you want zero dependencies |
Neither one is more correct than the other. They are two answers to the same question, and the machine in front of you decides which answer applies.
This is example code
Both projects are examples, not a product. They exist to save you the first afternoon and to give you something that already runs, so you can start from working code instead of a blank file. Take them apart, paste what you need into your own project, and treat the rest as disposable.
Visa.cs in particular declares only the six functions these demos need. VISA has many more, and things like device clear, triggering, reading the status byte and waiting on service requests are all missing here. Adding one is a single extra DllImport line, as long as you get the parameter types right. VisaNetDemo has less of this problem, because the VISA.NET packages already expose the full API; the demo simply does not use most of it.
Troubleshooting
| Problem | Solution |
|---|---|
DllNotFoundException: Unable to load DLL 'visa64.dll' |
No VISA is installed, or the process is 32-bit. Install a VISA, and check the project still has PlatformTarget set to x64. |
VisaNetDemo throws at new ResourceManager(), or Find returns nothing at all |
The installed VISA is not registered as a .NET provider, or the provider package does not match it. Install NI-VISA, swap the package for your vendor's, or use VisaPInvokeDemo, which does not care. |
| The build fails on NuGet restore | No internet on that machine. VisaPInvokeDemo needs no packages and builds offline. |
Open fails with 0xBFFF0011 |
The GPIBEE is not reachable at that IP, or no instrument answers at that GPIB address. Confirm the IP in a browser, then use the GPIB scan in the web interface. |
| Write works, read always times out | Either the instrument has nothing to say, which happens if you send a command that is not a question, or the read is not stopping where the answer ends. See Read termination. |
| The answer looks cut off | The read buffer was too small. Raise the 4096 in Read, or read again until the instrument has nothing left. |
| Long measurements fail, short ones work | The timeout is shorter than the measurement. Raise it past the longest operation you trigger. |
double.Parse throws on a reading |
A locale that uses the comma as decimal separator. Parse with CultureInfo.InvariantCulture. |