Overview
This is the Pascal counterpart to the Code::Blocks tutorial. Same idea, different language: a native Windows program that opens an instrument through GPIBEE, sends SCPI commands and reads the answers back. This time it has a window rather than a console.
The example is a complete Lazarus project, ready to download. It gives you a small GUI where you type a VISA resource name and a command, press buttons for Open, Read, Write, Query and Close, and watch a timestamped log of exactly what happened. It is a useful thing to keep around even after you have written your own program, because it answers the question "is it the instrument or is it my code" in about ten seconds.
By the end you will have that program running against your own instrument, and you will know the handful of calls needed to write your own.
Why Lazarus
Lazarus is a free, open source IDE for Free Pascal, and it is deliberately close to Borland Delphi: the same Object Pascal language, the same form designer with components dragged onto a window, the same event handlers behind the buttons. If you learned Delphi at some point, you already know how to use it, and a great deal of Delphi code compiles under it unchanged.
It also cross-compiles. The same project builds on Windows, Linux and macOS, which is the main reason people reach for it over Delphi.
Prerequisites
- A GPIBEE, with an instrument on the GPIB bus.
- Windows. The example targets Windows, though Free Pascal itself is cross-platform.
- A VISA implementation installed on the PC. See below.
- Lazarus. See further down if you do not have it.
Install a VISA
VISA is the standard API between your program and the instrument. Your code says "open this resource, write this string, read the answer", and VISA handles the transport underneath, whether that is LAN, USB or a GPIB card. GPIBEE appears on the network as a VXI-11 instrument, so any VISA can talk to it.
VISA is not part of Windows and does not come with Lazarus. You have to install one, and the example needs it only to run, not to compile.
NI-VISA and the Keysight IO Libraries Suite work just as well. If one is already installed, use it.
Install Lazarus
Skip this if you already have Lazarus. Otherwise the official download page is:
Pick the current release for 64-bit Windows and accept the defaults. The installer brings the Free Pascal compiler with it, so there is no separate toolchain to set up: install it, start it, and you can build.
Download the example
Complete Lazarus project in Object Pascal. Builds with no VISA SDK, headers or import library installed.
Unpack it somewhere convenient. Inside:
| File | What it is |
|---|---|
XyGpibDemo.lpi | The Lazarus project file. This is the one you open. |
XyGpibDemo.lpr | The program source, which does nothing but start the form. |
MainForm.pas / .lfm | The window and the code behind its buttons. This is where you will spend your time. |
XyGPIB.pas | The TXyGpibInstrument class described on this page. The only unit your own code needs to use. |
VisaInterface.pas | The VISA runtime loader underneath it. Used internally; you should not need to open it. |
VisaInterface.pas declares the few VISA types it uses itself rather than needing the IVI Foundation headers, and the VISA DLL is loaded at run time instead of being linked. The project therefore compiles on a machine with no VISA installed at all. VISA becomes a requirement only when you press Open.
Open and run the project
Open XyGpibDemo.lpi in Lazarus. The .lpi is the project file: it ties the units together and carries the compiler settings. Opening MainForm.pas on its own gives you a lone source file with no project around it, and the build commands will have nothing to build.
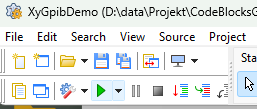
Then start it with the green play button in the toolbar, which compiles the project and runs it in one step. F9 does the same thing from the keyboard.
The window comes up like this:
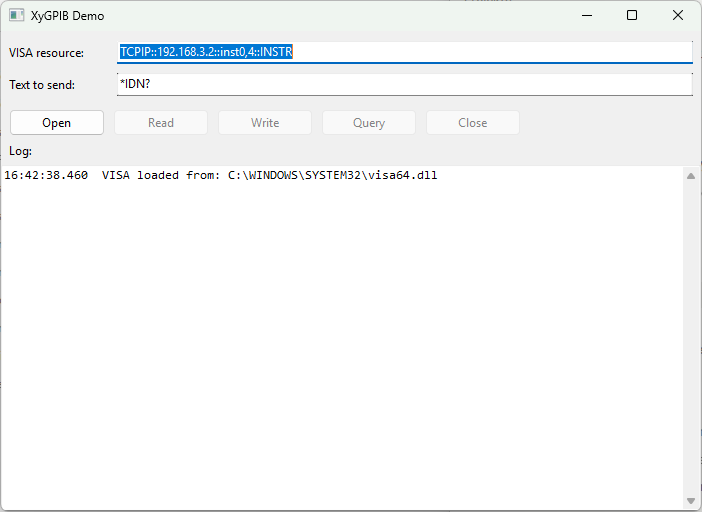
That first log line, VISA loaded from: C:\WINDOWS\SYSTEM32\visa64.dll, is written at startup before you touch anything. If you see it, the VISA part of the chain is already proven and any later problem lies further along.
Only Open is enabled to begin with. Read, Write, Query and Close stay greyed out until a session exists, which saves you from the most common first mistake.
The resource name
The resource field is pre-filled with:
Read from the left: reach the device over TCP/IP, at 192.168.3.2, and talk to GPIB address 4 behind it. The address here is a GPIBEE connected over USB, which presents itself on its default address 192.168.3.2. That is used purely because it is predictable and makes a good demo. Nothing about this is USB-specific: over Ethernet it works identically, you simply put in whatever address the adapter has on your network, which could be anything.
You do not have to work the string out by hand. The R&S VISA Tester searches the network, lists what it finds and hands you the exact name to paste. The VISA tutorial covers that, including the GPIB scan that shows which addresses are actually occupied.
Using the demo
Open
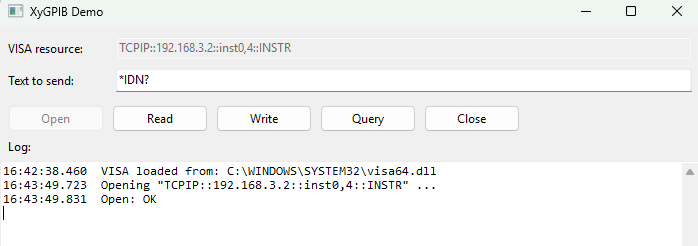
Press Open. The session is created and the other four buttons come to life:
Query
With *IDN? in the command field, press Query. That writes the command and reads the answer in one step:
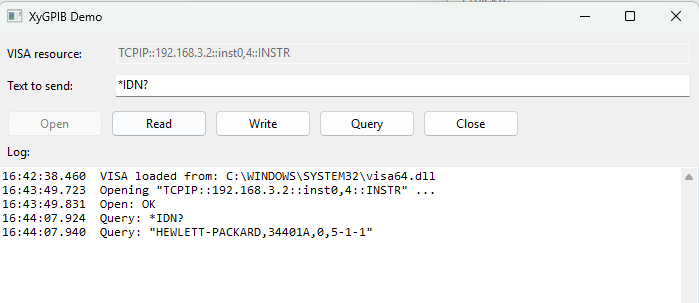
*IDN? is part of the IEEE 488.2 common command set, so almost any SCPI instrument understands it. That makes it the right first thing to send: if it comes back, the entire chain works, and everything after that is a matter of sending different commands.
Write and Read
Write sends the command field and returns immediately, which is what you want for commands that produce no answer, such as *RST or CONF:VOLT:DC. Read fetches a reply on its own. Query is simply the two in sequence, and is what you want for anything ending in a question mark.
Pressing Read when nothing is waiting will sit there until the timeout expires and then report a failure. That is normal and is worth doing once deliberately, so you recognise it later.
Close
Close releases the session and re-enables the resource field, so you can point the program at a different instrument without restarting it.
When it does not work
If the GPIBEE cannot be reached, or nothing answers at the GPIB address you asked for, Open fails and the log says so:
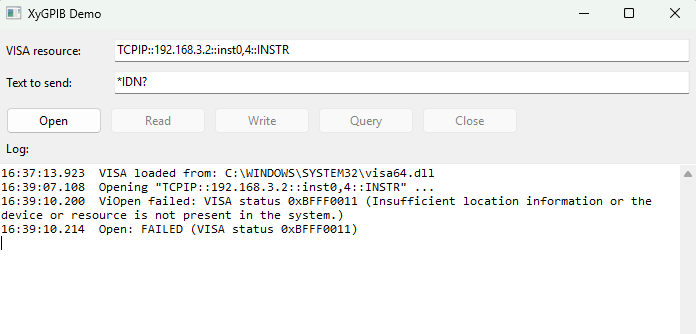
Two lines matter here. ViOpen failed: VISA status 0xBFFF0011 (Insufficient location information or the device or resource is not present in the system.) is VISA's own wording, decoded and routed into the log window. Below it, Open: FAILED is the demo's own message.
Note that the first line in that log is still the successful VISA load. VISA is working; the problem is past it.
Despite the wording, 0xBFFF0011 almost always means one of two ordinary things: the adapter is not reachable at that IP address, or it is reachable but nothing answers at that GPIB address. Check in that order. Open the GPIBEE web interface in a browser to confirm the address, then use its GPIB scan to see which addresses actually have an instrument on them. An instrument switched off, set to a different address, or with a GPIB connector not seated properly all produce this same error.
Termination and timeout
Termination is how both ends know a message has ended, and it is the single most common reason a first attempt hangs until it times out. The demo fixes both, along with the timeout, in one place near the top of MainForm.pas:
const
  { Fixed for this demo: LF write/read termination (typical for SCPI
    over VXI-11/GPIB-LAN instruments), 3 s I/O timeout. See XyGPIB.pas
    for the other TXyGpibTerm choices (xtCR, xtCRLF, xtEOI) if your
    instrument needs different termination. }
  IoTimeoutMs = 3000;
  WriteTerm   = xtLF;
  ReadTerm    = xtLF;
Change those and rebuild if your instrument wants something different. Write and read are set independently, which matters because plenty of instruments are not symmetrical about it.
Write termination is appended to every string you send. Most SCPI instruments expect a line feed and will wait silently if they do not get one.
Read termination is applied to the session itself, so the read returns the moment the terminator arrives instead of waiting out the full timeout. Read then strips the trailing CR, LF or CRLF from what it returns, so you never have to trim it yourself.
| Value | On write | On read |
|---|---|---|
xtLF | appends #10 | stops at #10. The usual choice, and what the demo uses. |
xtCR | appends #13 | stops at #13. Some older instruments want this. |
xtCRLF | appends #13#10 | stops at #10, since VISA matches a single byte and CRLF always ends in LF. |
xtEOI | appends nothing | no terminator byte. The read ends on the EOI signal alone, and nothing is stripped. |
If you do not know what your instrument wants, start with xtLF for both. If writes clearly work but reads always time out, the read termination is the first thing to change.
The timeout
IoTimeoutMs is in milliseconds and applies to every read and write on the session. Three seconds suits most instruments. It is an upper bound rather than a delay: a read that gets its answer immediately returns immediately, and the timeout only decides how long the call waits before giving up.
Raise it if you trigger long measurements. A sweep that takes ten seconds to complete needs a timeout longer than the sweep, or the read gives up while the instrument is still working. The failed-open screenshot above shows the other side of this: those three seconds of execution time are exactly IoTimeoutMs elapsing.
Write, read and query
Three methods cover almost everything you will do with a SCPI instrument. All three return Boolean: True means it worked, and no VISA status code reaches your code.
Write: send a command
The termination configured at Open time is appended for you, so do not add it yourself.
FInstrument.Write('*RST');                  { reset the instrument  }
FInstrument.Write('CONF:VOLT:DC 10,0.001'); { 10 V range, 1 mV res. }
Read: fetch an answer
The answer comes back through an out parameter, so there is no buffer to allocate or size. The trailing CR/LF is already removed.
var
  Response: string;
begin
  if FInstrument.Read(Response) then
    Log('got: ' + Response);
end;
Read takes an optional maximum length, defaulting to 256 bytes. Raise it for long replies such as error lists or captured data:
FInstrument.Read(Response, 4096);
Query: write then read, in one call
This is the workhorse, and what the Query button does.
var
  Response: string;
begin
  if not FInstrument.Query('*IDN?', Response) then
    Log('query failed')
  else
    Log('instrument: ' + Response);
end;
Put together, a complete measurement is short:
var
  Response: string;
  Volts: Double;
begin
  FInstrument.Write('CONF:VOLT:DC');

  if FInstrument.Query('READ?', Response) then
  begin
    Volts := StrToFloat(Trim(Response));
    Log(Format('%.6f V', [Volts]));
  end;
end;
StrToFloat follows the system locale, and an instrument always sends a dot. On a German or French Windows that combination raises an exception. Use StrToFloat(S, FS) with a TFormatSettings whose DecimalSeparator is '.' for anything you intend to keep.
When the text methods are the wrong tool
Screenshots, waveform dumps and anything else that is not text can contain any byte value. For those use WriteRaw and ReadRaw, which add nothing, strip nothing, and report exactly how many bytes arrived.
var
  Buffer: array[0..65535] of Byte;
  Got: SizeUInt;
begin
  FInstrument.Write('HCOP:DATA?');

  if FInstrument.ReadRaw(Buffer, SizeOf(Buffer), Got) then
    Log(Format('%d bytes', [Got]));
end;
XyGPIB reference
Everything the demo uses. TXyGpibInstrument is an ordinary class: create one, open it, use it, free it. Methods that can fail return Boolean.
| Method | What it does |
|---|---|
| Startup (class methods, shared by every instance) | |
class function LoadVisa(out ALoadedPath: string): Boolean |
Loads the system VISA runtime, trying visa64.dll then visa32.dll. Call once before opening anything. Returns the path it loaded in ALoadedPath. |
class function VisaLoadErrorDetail: string |
Why the previous LoadVisa failed, in readable text. |
| Lifetime | |
constructor Create |
Creates an instrument object. No session exists yet. |
function Open(const AResourceName: string; AWriteTerm, AReadTerm: TXyGpibTerm; ATimeoutMs: LongWord): Boolean |
Opens the resource, sets the timeout and both termination modes. |
function Close: Boolean |
Closes the session. Safe to call when not open; the session is released either way. |
property IsOpen: Boolean |
Whether a session is currently open. The demo uses this to enable and disable its buttons. |
| Text transfers | |
function Write(const AText: string): Boolean |
Sends AText with the write termination appended. |
function Read(out AText: string; AMaxLength: Integer = 256): Boolean |
Reads a reply and strips the trailing CR/LF. AMaxLength caps how much is read. |
function Query(const ACommand: string; out AResponse: string; AMaxLength: Integer = 256): Boolean |
Write then read, in one call. |
| Binary transfers | |
function WriteRaw(const AData; ALength: SizeUInt): Boolean |
Sends exactly ALength bytes, unmodified. |
function ReadRaw(var ABuffer; AMaxReadLength: SizeUInt; out AActualReadLength: SizeUInt): Boolean |
Reads up to AMaxReadLength bytes with no stripping. AActualReadLength receives the count, and is 0 on failure. |
| Diagnostics (class-wide) | |
class procedure SetDebug(AEnable: Boolean) |
When on, every VISA error is reported as it happens. Off by default; the demo switches it on. |
class property OnLog: TXyGpibLogEvent |
Where those reports go. A console program would print to stderr; the demo points this at its log window, which is why VISA's own error text appears there. |
class function GetLastVisaError: TViStatus |
The VISA status of the most recent call that failed. One remembered value, not a queue, and a later success does not clear it. |
ViOpen failed: come from VISA itself, by way of SetDebug(True) and OnLog. Three lines in FormCreate wire that up. It is worth copying into your own program, because it turns a silent failure into a sentence.
What XyGPIB is, and is not
XyGPIB is example code, not a product. It is one unit that ships inside the project you just downloaded. There is no library to install, no version to track, no release notes and no support commitment behind it. It is yours to read, change, rename, cut down or delete outright.
It is meant to be taken and used. That is the point of it being here: copy XyGPIB.pas into your own project and you have GPIBEE talking to an instrument on the first afternoon rather than the third. Loading the VISA runtime, opening and closing sessions cleanly, getting the termination attributes right and turning status codes into something readable are all solved already, and those are exactly the parts that cost a day each when you start from nothing. Treat it as a running start for your own integration, not as a finished component to be admired from a distance.
The other half of its job is keeping a first program readable. VISA is a capable and fairly large API, and meeting it head-on means a resource manager session, an instrument session, attribute codes for timeout and termination, and a status code to decode after every call, all before you can ask an instrument its name.
Working with VISA directly is a perfectly good choice, and past the basics it is the better one. Everything XyGPIB does, VISA does; XyGPIB simply exposes fewer operations with an easier interface. When you outgrow it, use VisaInterface.pas from the project, or your own external declarations, and call VISA yourself. The two mix freely in the same program.
This is the same helper as in the Code::Blocks tutorial, translated to Object Pascal. The behaviour matches; the signatures follow Pascal conventions, so the C XyGPIB_Open(handle, ...) becomes a method on an object, and the C caller's buffer becomes an out parameter.
What is deliberately missing
XyGPIB covers opening a session and moving bytes, and stops there. Several GPIB primitives you may well need are simply not in it:
- Device clear, to reset an instrument's interface and empty its buffers (
viClearin VISA). - Triggering, the Group Execute Trigger that starts a measurement on one or several instruments at once (
viAssertTrigger). - Reading the status byte by serial poll, the usual way to ask an instrument whether it is finished or has an error waiting (
viReadSTB). - Service requests and events, so an instrument can interrupt you rather than being polled.
- Locking, and the full VISA attribute set.
None of these are missing by oversight, and none are waiting on a future version. This is example code: adding them would make it a library, which is not what it is for. VISA offers all of them, and since XyGPIB is a thin layer over VISA you can call them directly alongside it in the same program.
Troubleshooting
| Problem | Solution |
|---|---|
| "Could not load a working VISA runtime" at startup | No VISA installed, or a 32-bit build looking for a 64-bit DLL. Install R&S VISA, and check the project is building 64-bit. |
Open fails with 0xBFFF0011 |
The GPIBEE is not reachable at that IP, or no instrument answers at that GPIB address. Confirm the address in a browser, then use the GPIB scan in the web interface. |
| Write works, Read always fails | Read termination. The instrument is not sending the terminator you configured. Try xtEOI, or one of the other CR/LF variants, in MainForm.pas. |
| The answer has a stray character at the end | You are using xtEOI, which strips nothing by design. Switch to xtCR, xtLF or xtCRLF, or trim it yourself. |
| Long measurements fail, short ones work | The timeout is shorter than the measurement. Raise IoTimeoutMs past the longest operation you trigger. |
| Answers arrive one command late | A previous read left data queued, usually after a truncated read. Raise AMaxLength, and make sure every query is read exactly once. |
StrToFloat raises an exception on a reading |
A locale using the comma as decimal separator. Pass a TFormatSettings with DecimalSeparator := '.'. |