OverviewNEW IN V1.6
Most GPIB instruments have a perfectly good front panel — it's just on the other side of the lab, behind a rack, or under a pile of cables. Benches give you a second front panel, in your browser, that you build yourself in a few minutes without writing a single line of code.
A bench is a page of readouts, switches, selectors, entry fields and buttons. You say which GPIB command sits behind each one, and GPIBEE does the rest: it polls the readings, formats the numbers, and turns every click into bus traffic. The whole definition lives on the GPIBEE itself — no PC software, no Python, no runtime to install. Open the web interface from any machine on the network, or from a tablet, and your instrument is right there.
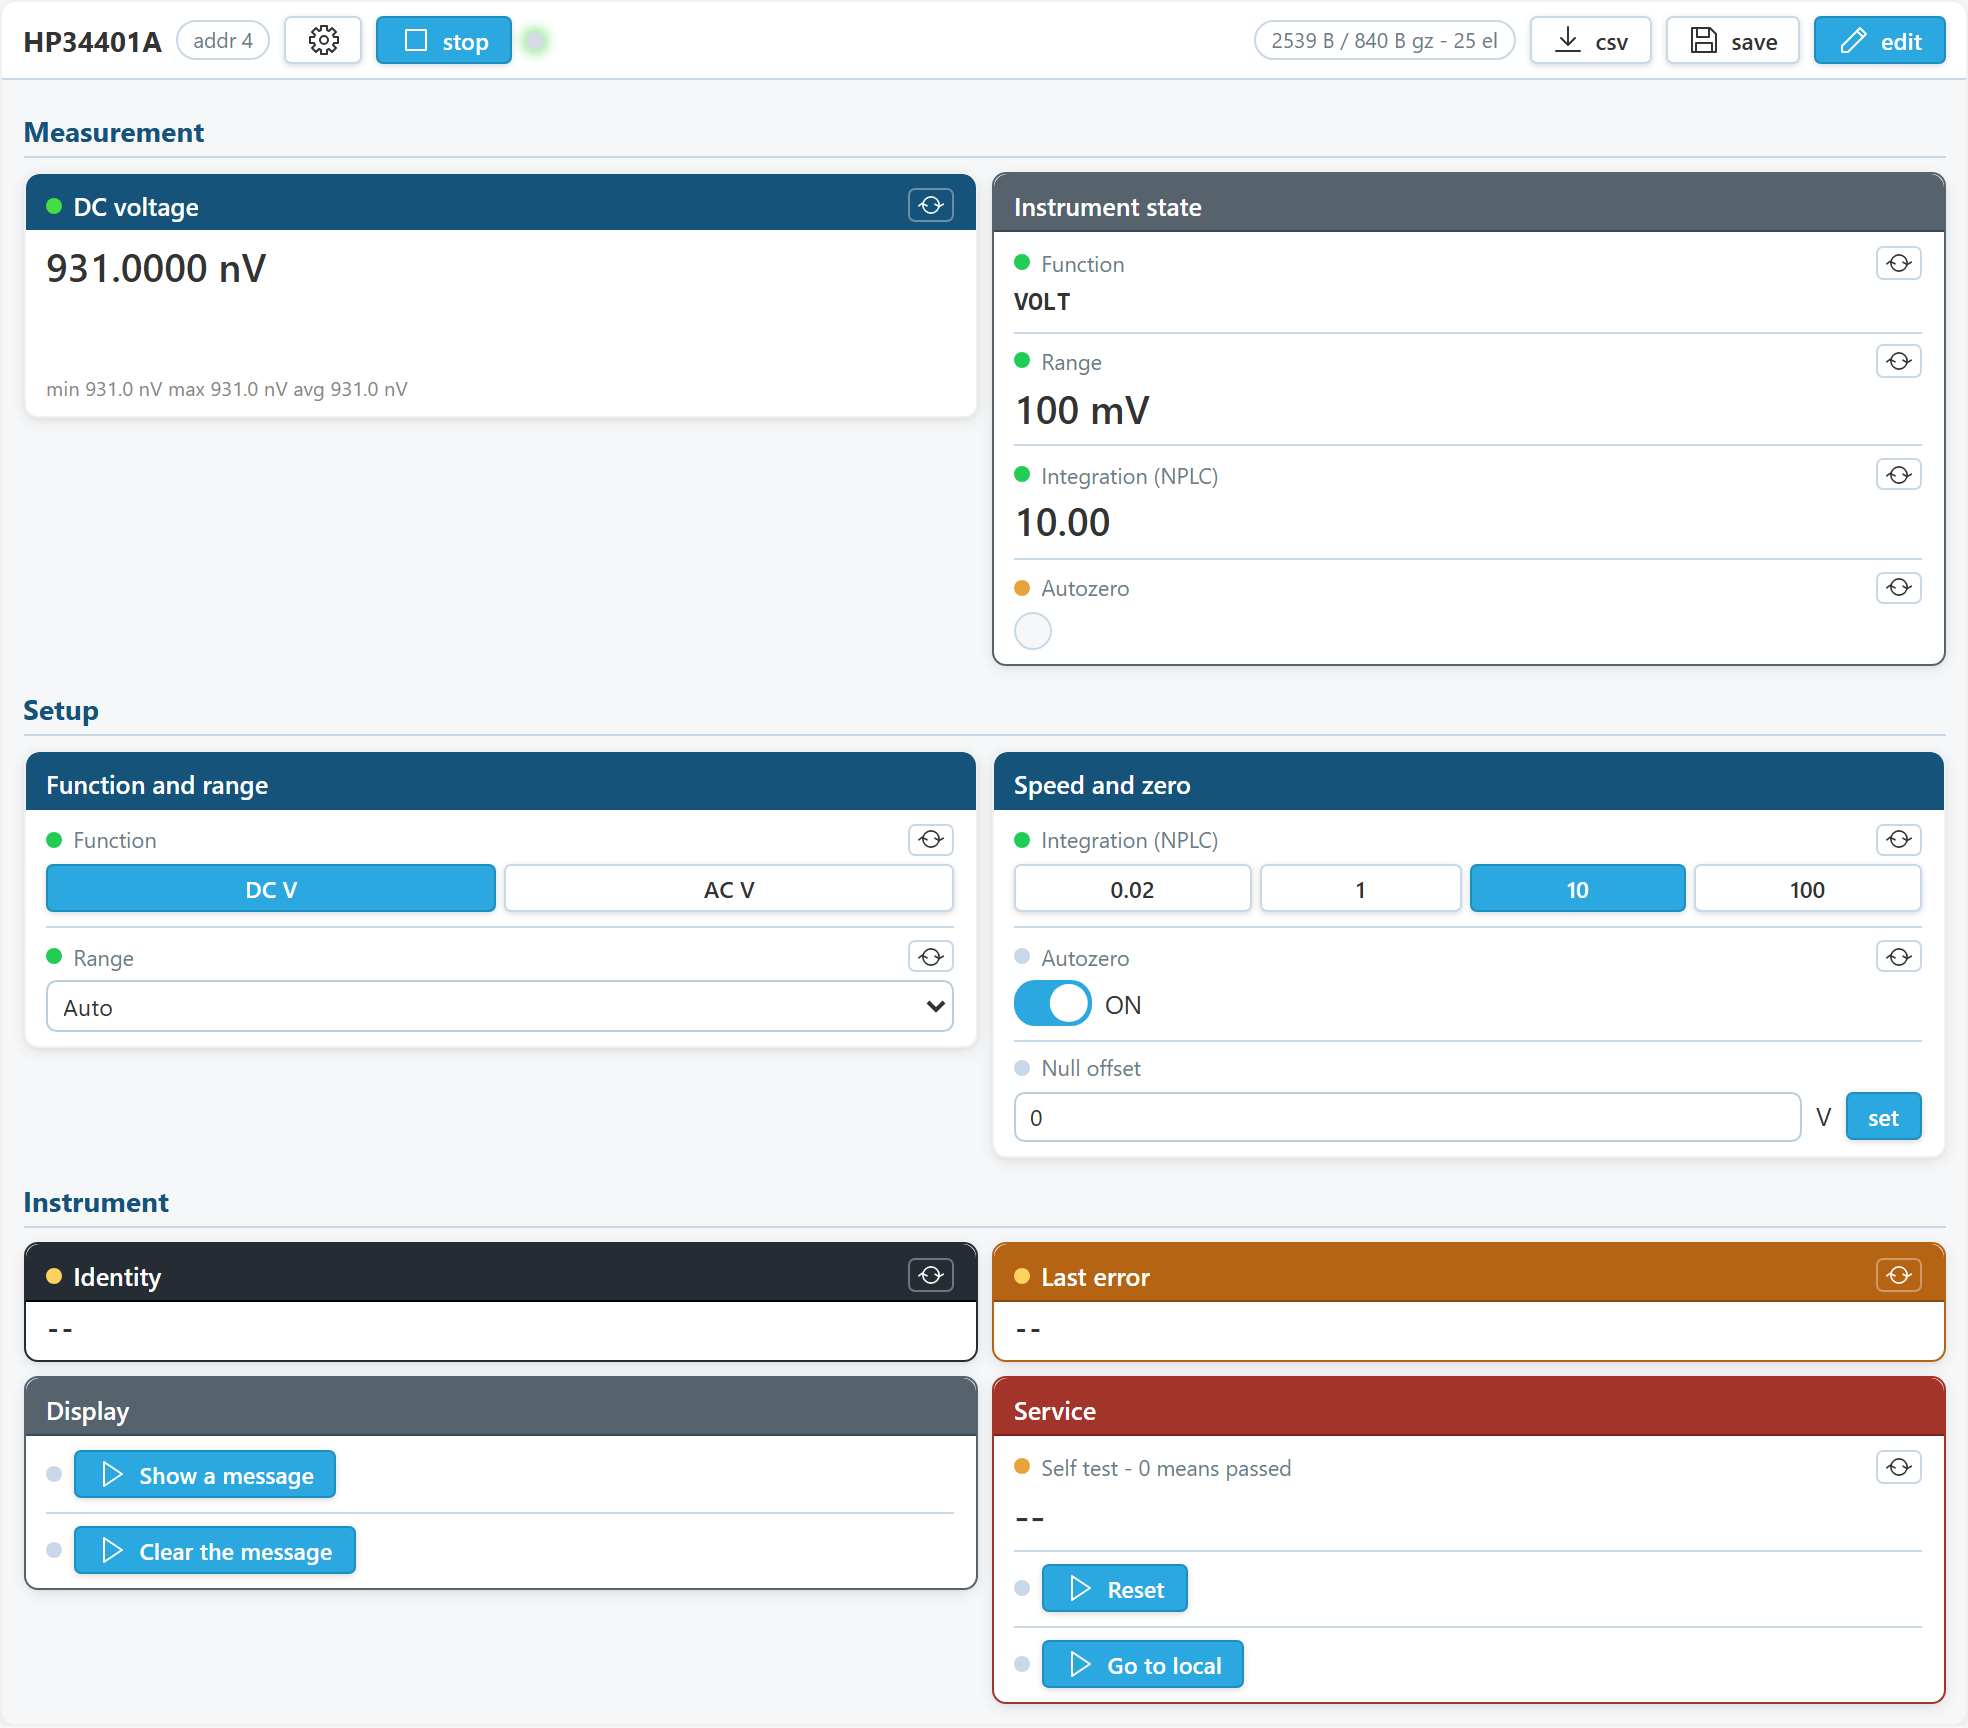
This tutorial builds exactly that bench from an empty page. It takes about fifteen minutes, and the same steps work for practically any instrument on the bus — the only thing that changes is which commands you type in.
What a bench is not
It's worth being clear about this before you start, because it shapes what benches are good at.
The dividing line in practice: if you would describe the task as "set this, look at that, press that", a bench is the fastest way to get there. If you would describe it as "for each of these 200 values, measure and record", write a script.
Prerequisites
- Firmware V1.6 or later on your GPIBEE.
- The web interface reachable in a browser —
192.168.3.2in USB Network Mode, or your device's address on Ethernet. - An instrument on the bus. This tutorial uses an HP 34401A on primary address 4; if yours is elsewhere, use its address wherever 4 appears.
- The instrument's programming manual, or at least the handful of commands you care about.
Creating your first bench
Benches have their own entry in the sidebar:
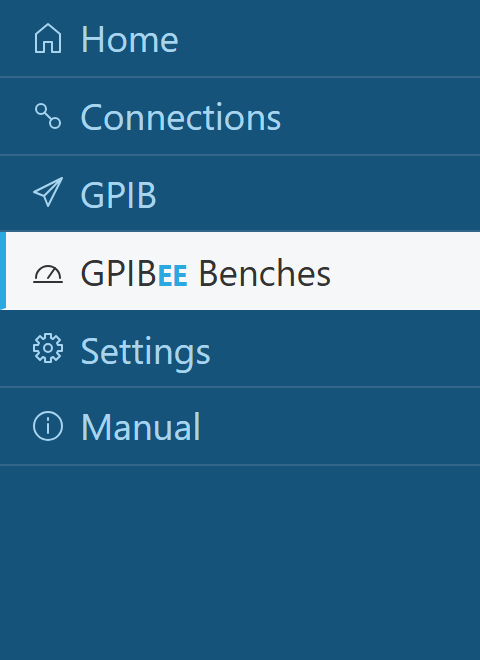
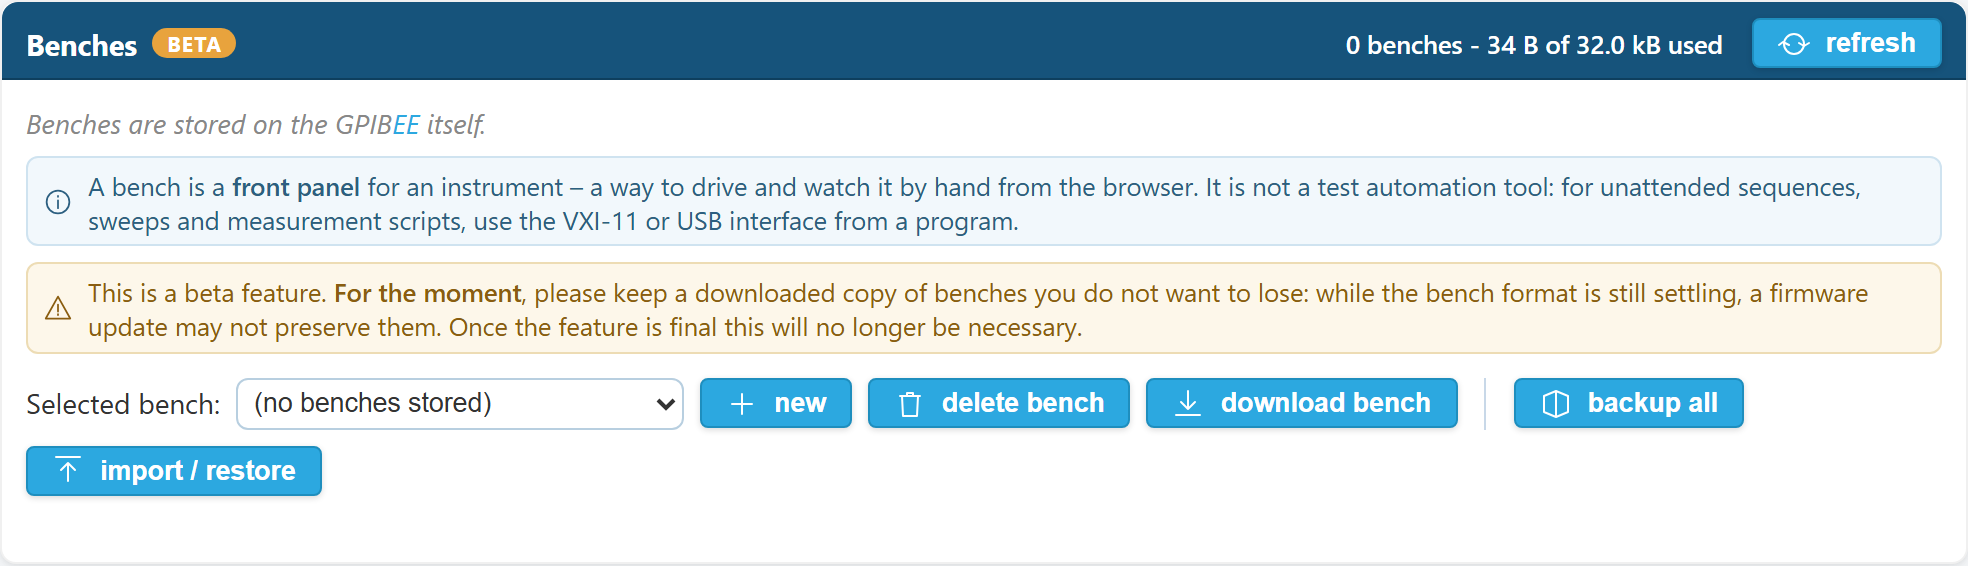
Open it and you get the management card at the top of the page, plus the bench itself underneath. On a fresh device there is nothing stored yet:
1Press new, type a name — up to 24 characters, and the instrument's model number is usually the right choice — then press create.
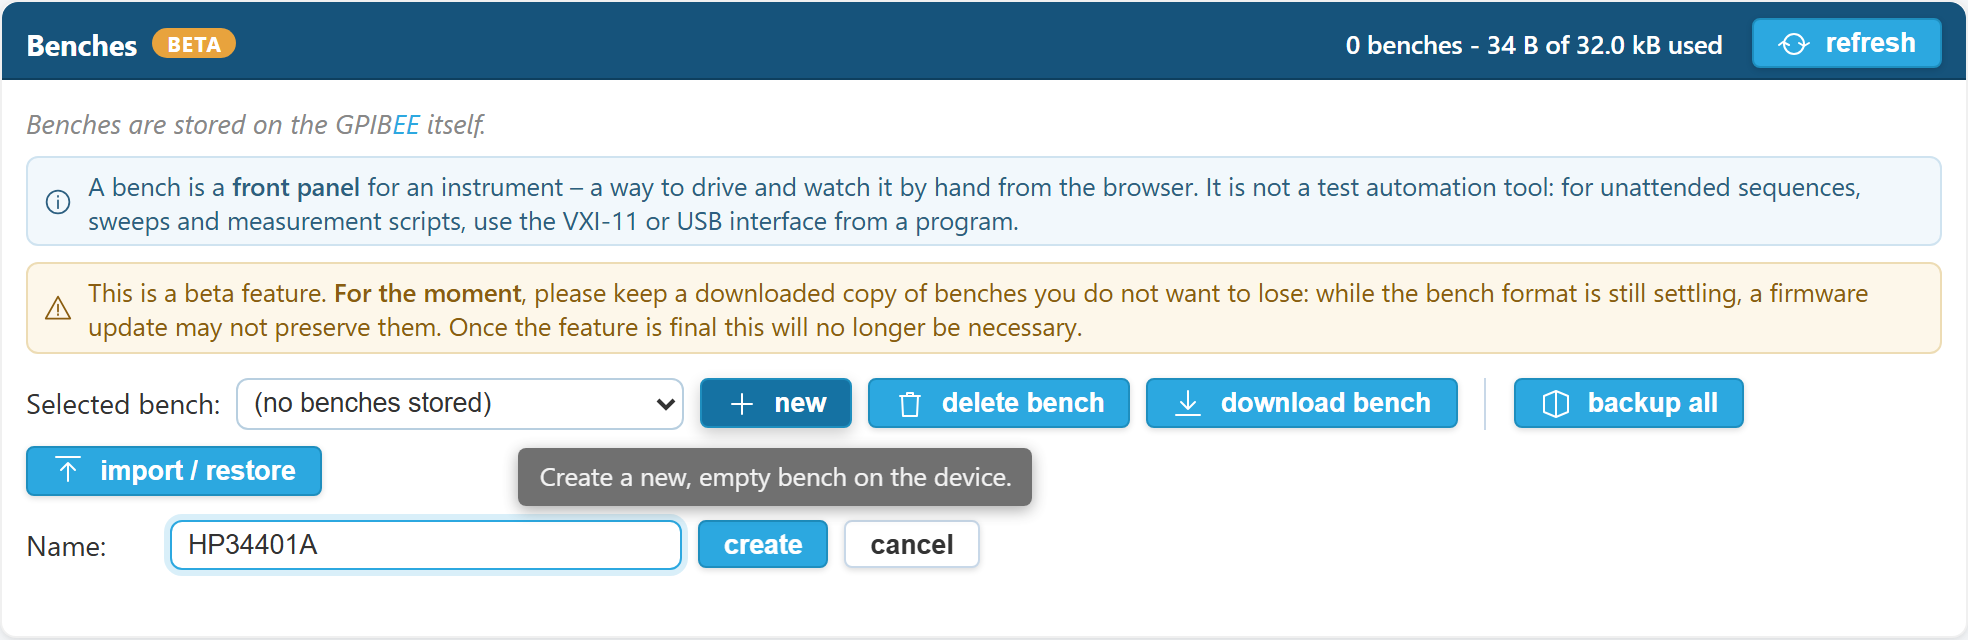
The new bench opens below, empty, in edit mode. Edit and run are the two modes a bench is ever in, and the button on the far right switches between them. In edit mode nothing talks to the instrument unless you ask it to.

Your first reading
2Click + add element. A bench is made of five kinds of element, and you pick one here:
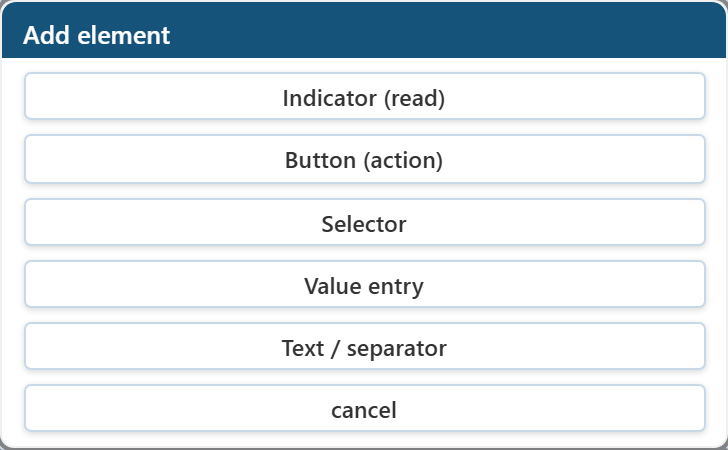
- Indicator (read) — something the instrument tells you. A number, a lamp, a dial, a bar, or the raw text of the reply.
- Button (action) — runs a command sequence when pressed, or downloads a file.
- Selector — a row of buttons, a dropdown or a two-position switch; each option sends its own commands.
- Value entry — a number field with a set button.
- Text / separator — a section heading or an italic note. Purely visual, and, as you'll see later, the way to give a card a title.
3Choose Indicator (read). The element editor opens on the right. The top of it is the same for every element type:
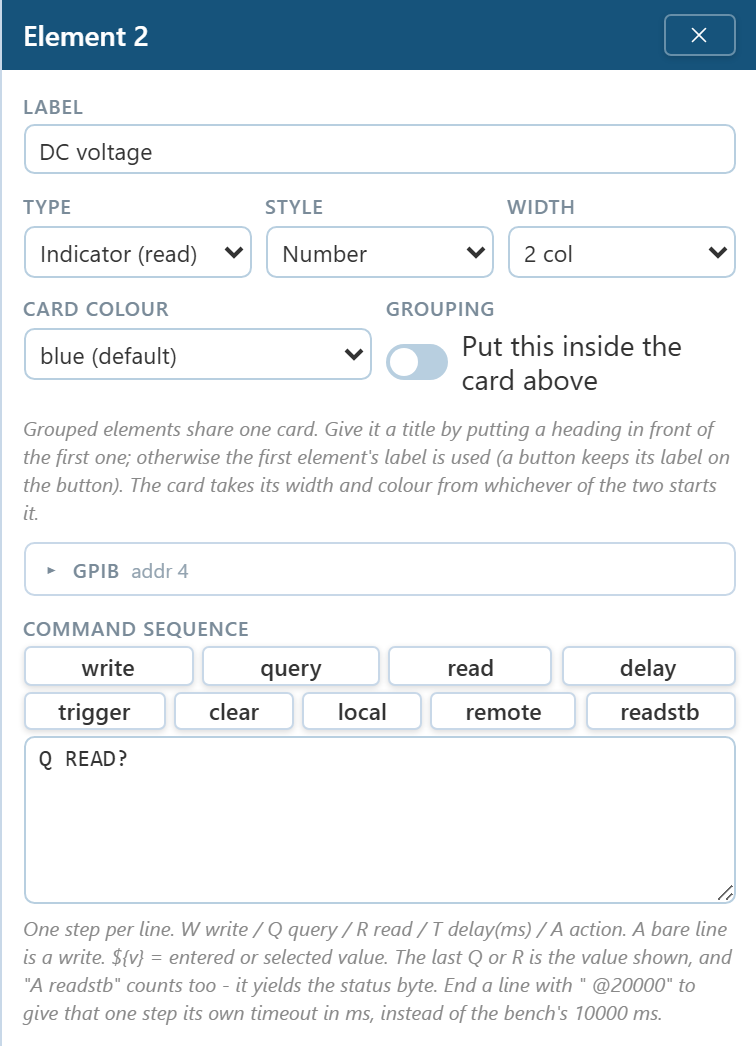
Set the label to DC voltage, leave the style on Number, and set the width to 2 col so the main reading gets some room. Then the important part, the command sequence:
Q READ?
One step per line. Q is a query — write the text, then read the reply. The other verbs are W write, R read without writing first, T delay in milliseconds, and A for a bus action such as trigger, clear, local, remote or a serial poll. The buttons above the box insert them for you. The reply of the last query in the sequence is the value that gets displayed, so a sequence can configure, trigger, wait and then read.
READ? and not MEAS:VOLT:DC?Because MEAS:VOLT:DC? forces the meter into DC volts on every single poll, which fights with the function selector we are going to add later. A generic "give me a reading" query leaves the instrument's own settings alone.
4Before saving anything, press test at the bottom of the editor. This runs the sequence once and shows you exactly what came back:
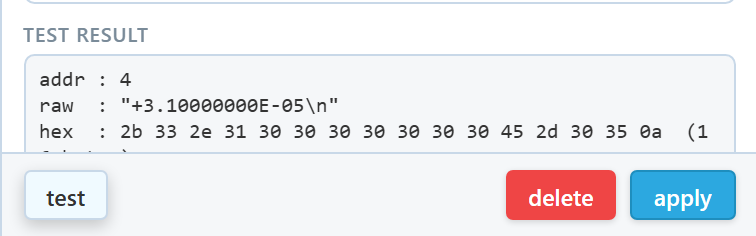
This is the single most useful button in the editor. If a command is wrong, you find out here instead of wondering why a card shows --.
5The Parse section turns the reply into a number. For a well-behaved SCPI instrument you can leave all of it alone — but this is where older instruments get tamed:
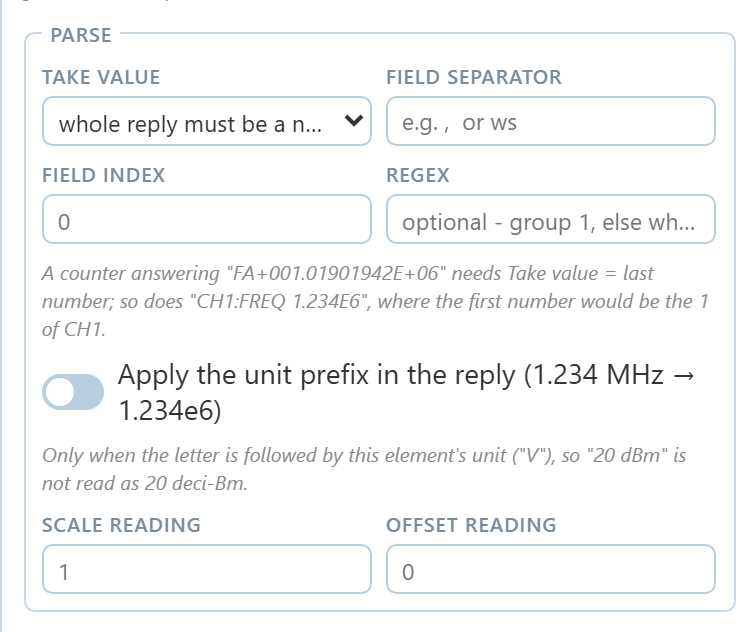
The one to know about is Take value. Plenty of instruments answer with letters attached — a counter that says FA+001.01901942E+06, a scope that says CH1:FREQ 1.234E6. Setting take the last number throws the letters away and keeps the value. Apply the unit prefix handles the ones that answer 1.234 MHz.
6The Display section decides how the number looks, and Update how often it is fetched:
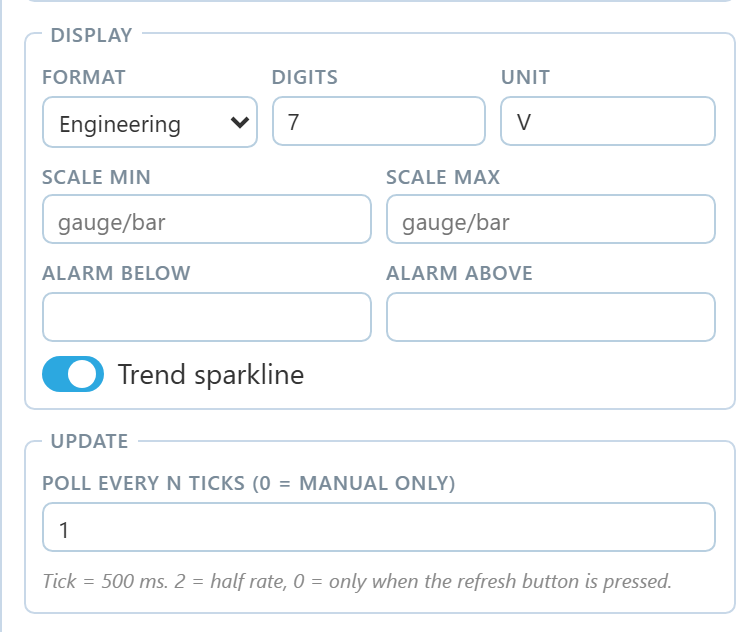
Set Unit to V, Digits to 7, and switch on Trend sparkline. Leave poll every N ticks at 1. A divider of 2 halves the rate; 0 means the element only reads when you press its refresh icon, which is what you want for anything slow or destructive.
7Press apply, then run mode, then run:
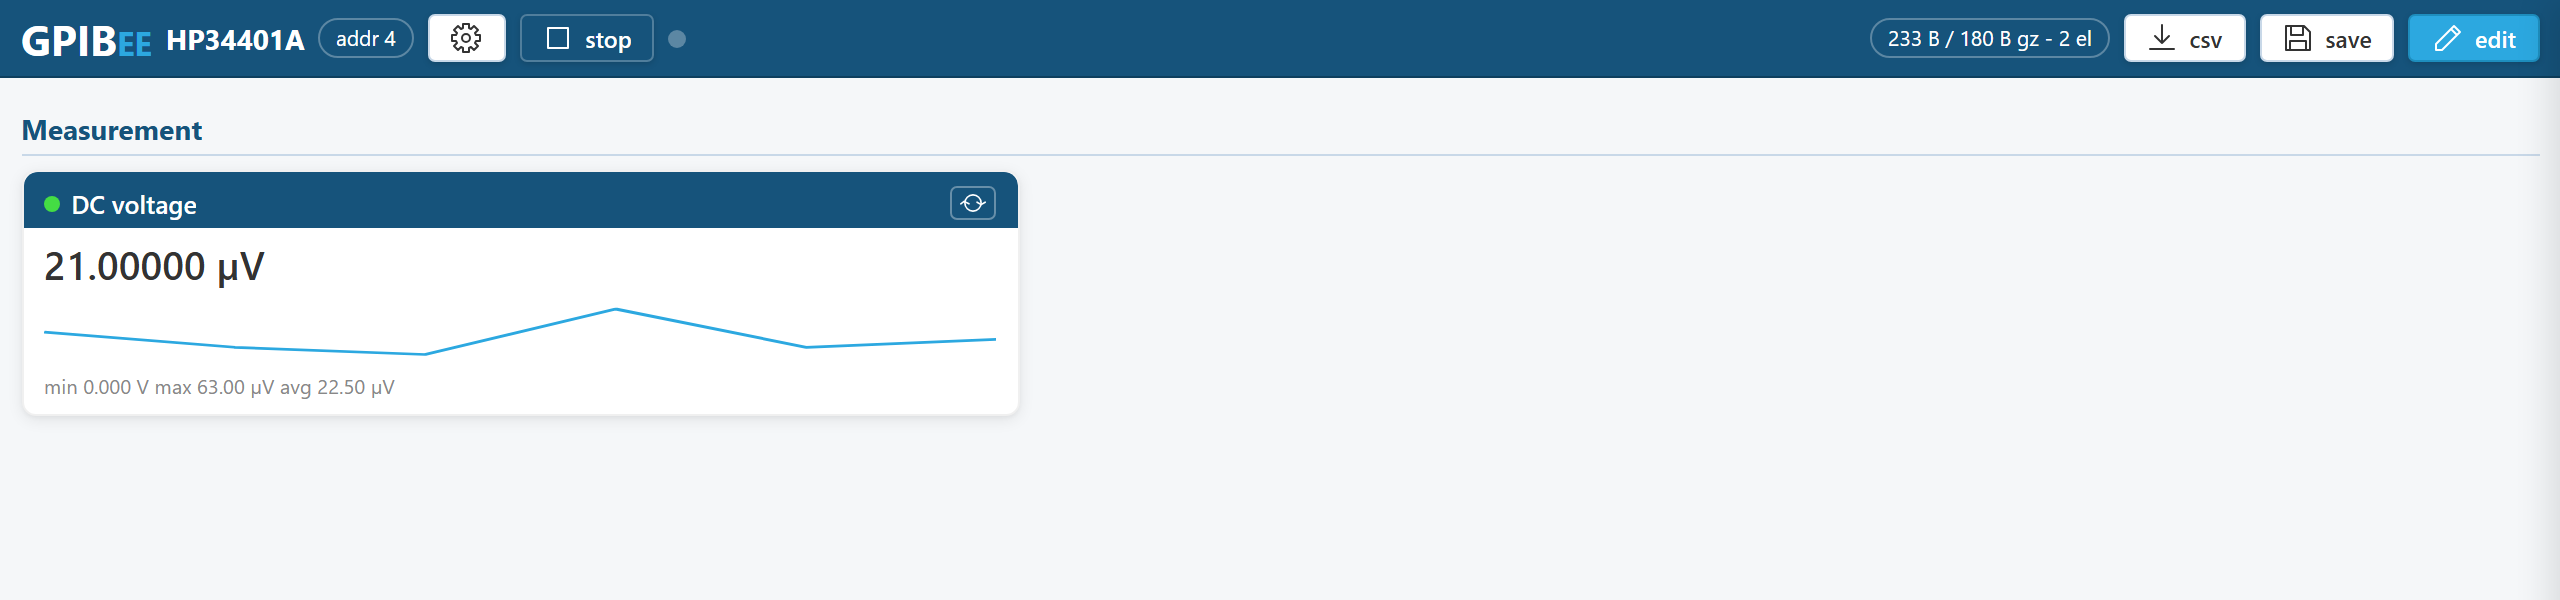
That is the whole loop: add an element, say what it sends, test it, run it. Everything from here is more of the same.
Bench settings
8Before adding more elements, open the gear icon in the bench header. These settings apply to the whole bench:
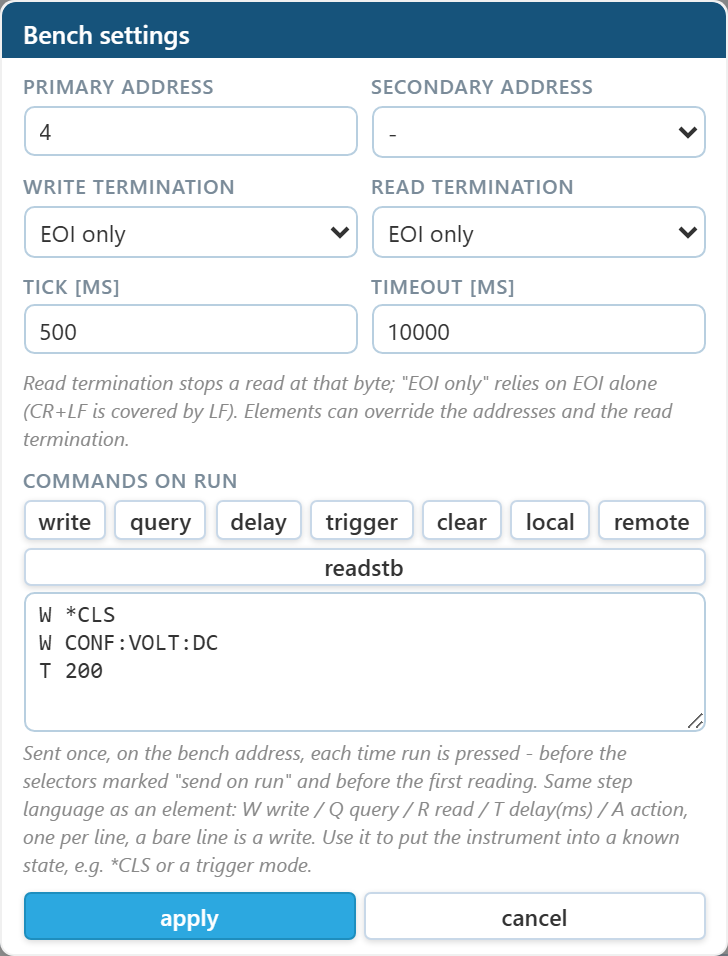
- Primary / secondary address — set the primary to
4for this tutorial. - Write and read termination — leave both on EOI only for a 34401A. Older instruments often need
\n; an HP 3457A, for instance, wants LF in both directions. - Tick — the base polling interval, 500 ms by default. Every indicator's poll divider is a multiple of this.
- Timeout — how long a single step may take. Keep it short so a dead instrument fails quickly, and give the few slow commands their own timeout by ending their line with
@30000. - Commands on run — sent once, every time you press run, before anything else. Use them to put the instrument into the state the bench assumes.
9Set the primary address to 4, leave the terminations on EOI only, set the timeout to 10000, and put these three lines into commands on run:
W *CLS
W CONF:VOLT:DC
T 200
Press apply. From now on every run starts by clearing the status byte and putting the meter into DC volts.
*RST in there. Pressing run should not silently wipe whatever somebody had set up on the front panel.
Grouping: the state card
Next to the big reading, it is useful to see what the meter thinks it is doing. That is four more indicators, and four more cards would already start to look like a wall. Instead they go into one card.
10Add a Text / separator, style Section header, label Instrument state, width 2 col, card colour grey. On its own this is just a heading. It becomes a card title in the next step.
11Add an Indicator straight after it and switch on Put this inside the card above:
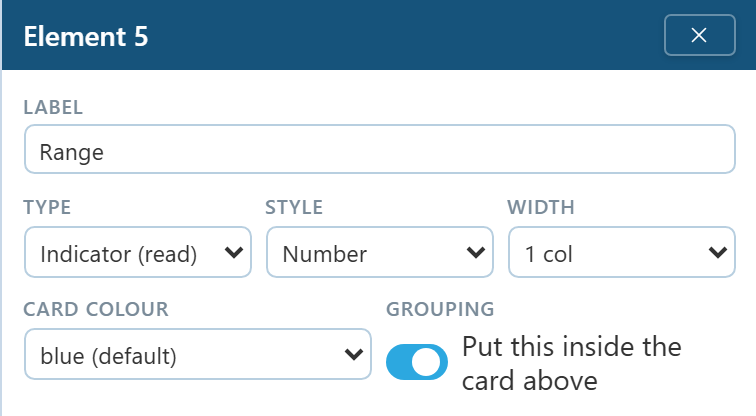
Give it the label Function, sequence Q FUNC?, poll every 4 ticks, format Text, and regex "([A-Z:]+)" — the 34401A answers "VOLT:DC" with the quotes included, and the regex takes what is inside them.
12Three more indicators the same way, each with Put this inside the card above switched on:
Range—Q VOLT:DC:RANG?, poll 4, unitV, engineering, 3 digitsIntegration (NPLC)—Q VOLT:DC:NPLC?, poll 4, fixed, 2 digitsAutozero—Q VOLT:DC:ZERO:AUTO?, poll 4, style Lamp, integer, lit when non-zero, and lamp only so the number beside it is hidden
Poll 4 rather than 1 on all of them, because settings change rarely and there is no point spending bus time on them at the rate of the main reading.
Selectors and value entry
Readings are only half of a front panel. The other half changes something.
13Add a Text / separator heading Setup — plain, full width, no colour. That closes off the measurement part of the bench.
14Add a heading Function and range, width 2 col, then a Selector with Put this inside the card above on. Label it Function, style Gang buttons, and give it two options:
DC V     CONF:VOLT:DC
AC V     CONF:VOLT:AC
The left field is the text on the button, the right one the commands it sends. Several commands go on separate lines inside one option.
15Another Selector in the same card, label Range, style Combobox because six choices is too many for a row of buttons:
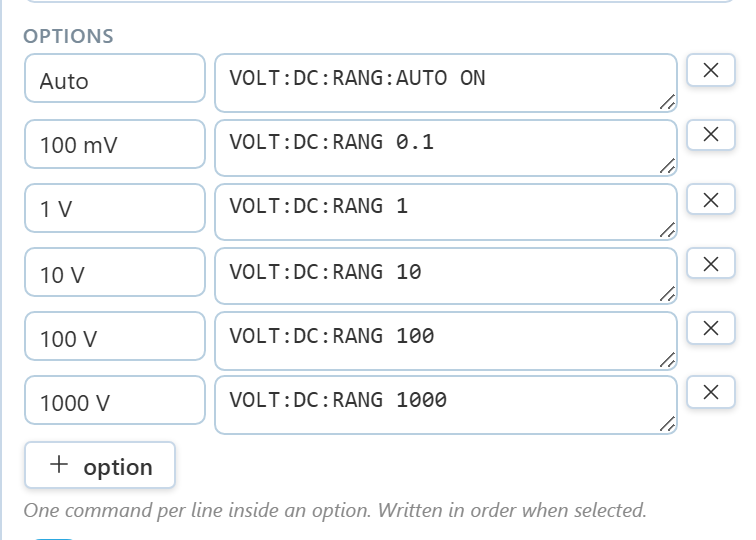
Tick Send the shown selection when run is pressed on both of these.
16One more card. Heading Speed and zero, width 2 col, then three grouped elements:
- Selector,
Integration (NPLC), gang buttons, options0.02/1/10/100sendingVOLT:DC:NPLC 0.02and so on, starting on the third option, send on run ticked - Selector,
Autozero, style Switch — exactly two options,ZERO:AUTO OFFandZERO:AUTO ON, starting on the second - Value entry,
Null offset, unitV, default 0, step 0.001, sequenceW CALC:NULL:OFFS ${v}
${v} is where the number you type goes. A value entry sends nothing until you press its set button.
Identity, errors and buttons
Two cards that belong on every bench you will ever build, and two that are specific to this meter.
17Add a heading Instrument, plain and full width. Then two indicators, not grouped, each 2 columns wide:
Identity—Q *IDN?, style Text so the reply is shown exactly as it arrives, poll 0, card colour blackLast error—Q SYST:ERR?, poll 0, format Text, regex"([^"]*)"to pull the message out of+0,"No error", card colour orange
The error readout is the one that will save you the most time. When a command you typed is wrong, this is where the meter says so.
18A card of buttons. Heading Display, width 2 col, grey, then two Button elements with Put this inside the card above on:
Show a message—W DISP:TEXT "GPIBEE BENCH"Clear the message—W DISP:TEXT:CLE
A button keeps its label on the button itself, which is why a button group needs a heading in front of it to get a title.
19The last card. Heading Service, width 2 col, card colour red, then three grouped elements:
- Indicator,
Self test - 0 means passed, sequenceQ *TST? @30000, poll 0, integer, alarm above 0.5 so a non-zero result turns red. The@30000gives that one step a 30 second timeout, because a self test takes far longer than the bench's normal 10 seconds. - Button,
Reset, sequenceW *RSTthenT 1500, with ask for confirmation ticked - Button,
Go to local, sequenceA local— a bus action, not a command, so it works on any instrument
20Press save. The bench is now stored on the GPIBEE, and the pill in the header tells you what it cost.
File downloads
A Button (action) element runs its command sequence when pressed — a reset, a trigger, a display message, a return to local control. Tick ask for confirmation on the ones you would rather not hit by accident.
Buttons can also bring data back out of the instrument as a file. Switch On press to Download file to disk and the reply is saved by your browser instead of displayed — a scope screenshot, a captured waveform, a saved instrument setup, an internal data log.
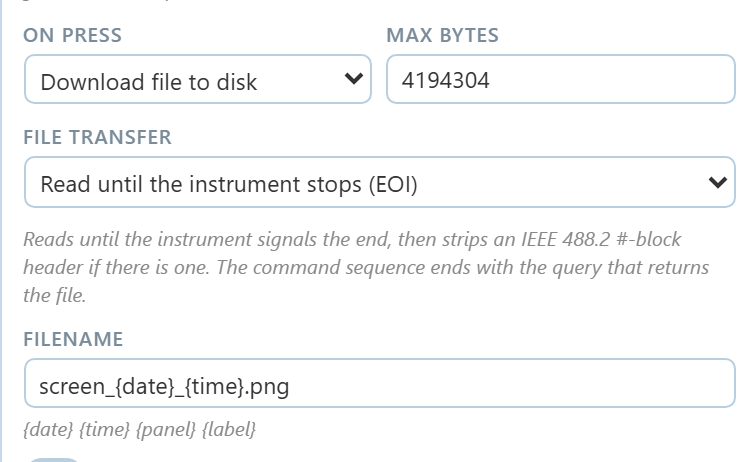
Two transfer modes are offered, because instruments disagree about how a block of binary ends:
- Read until the instrument stops (EOI) — the normal case. An IEEE 488.2
#-block header is stripped automatically if there is one. - Counted block —
#, one digit saying how many length digits follow, those digits, then exactly that many bytes. For instruments that never assert EOI at the end of a transfer. No read termination is used, so a0x0Ainside the data cannot cut the file short.
The filename accepts {date}, {time}, {panel} and {label}, so repeated downloads don't overwrite each other. If a transfer fails part way, a Device Clear is sent to that address automatically, so the unread remainder cannot surface as garbage on the next read.
Which command produces the file is entirely the instrument's business — HCOPy:DATA? on many SCPI scopes, HARDCOPY, CURVE? or a vendor-specific mnemonic elsewhere. Look it up in that instrument's manual, put it in the sequence, and press test: the test result shows the first bytes of the reply, which is usually enough to tell a PNG from an error message.
Logging to CSV
Every reading a bench takes while running is kept, and the csv button in the header downloads the lot. One column per indicator, one row per tick, with an ISO timestamp in the first column. The log is cleared each time you press run, so a download always contains exactly one run and nothing older.
Saving, sharing and backups
Nothing is stored on the device until you press save in the bench header. The pill next to it shows what the bench costs — the raw size, the stored size, and the number of elements — so you can see how much room is left as you build.
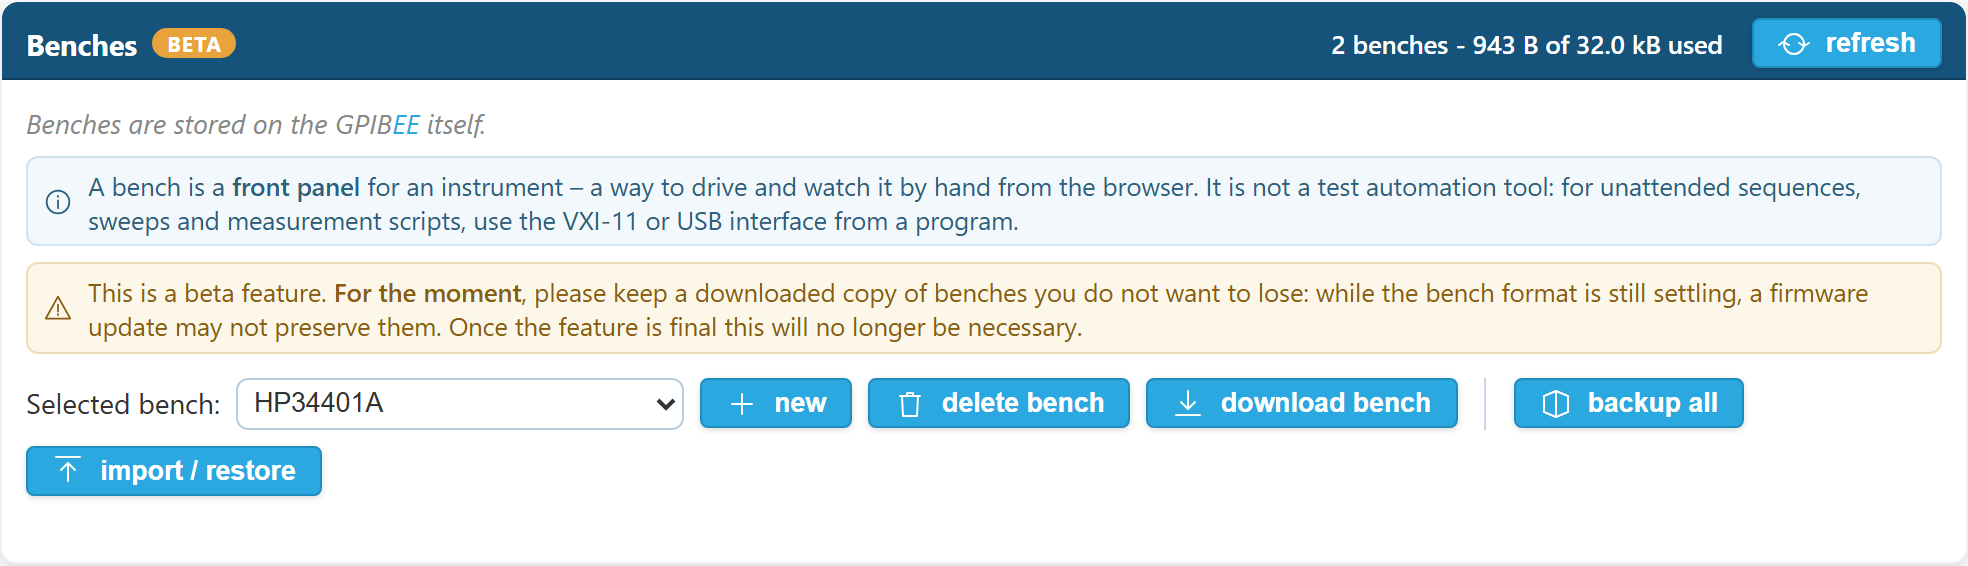
- download bench writes the selected bench to a single
.gpibeefile. That is what you send to somebody else who owns the same instrument. - backup all writes every stored bench in one file, exactly as the device holds them.
- import / restore reads either kind back in. A single-bench file is added next to what you already have; a backup replaces everything, after asking. Both are checked before anything is written to the device.
.gpibee files, from multimeters and a function generator to a CMU200 spectrum analyzer and a model-independent IEEE 488.2 panel. If you build one worth sharing, send it in through the support page and it can go up there for everybody else with that instrument.
The finished bench
Put together, the bench for the HP 34401A looks like this in edit mode — every card outlined, every element with its own move, insert, duplicate and edit buttons:
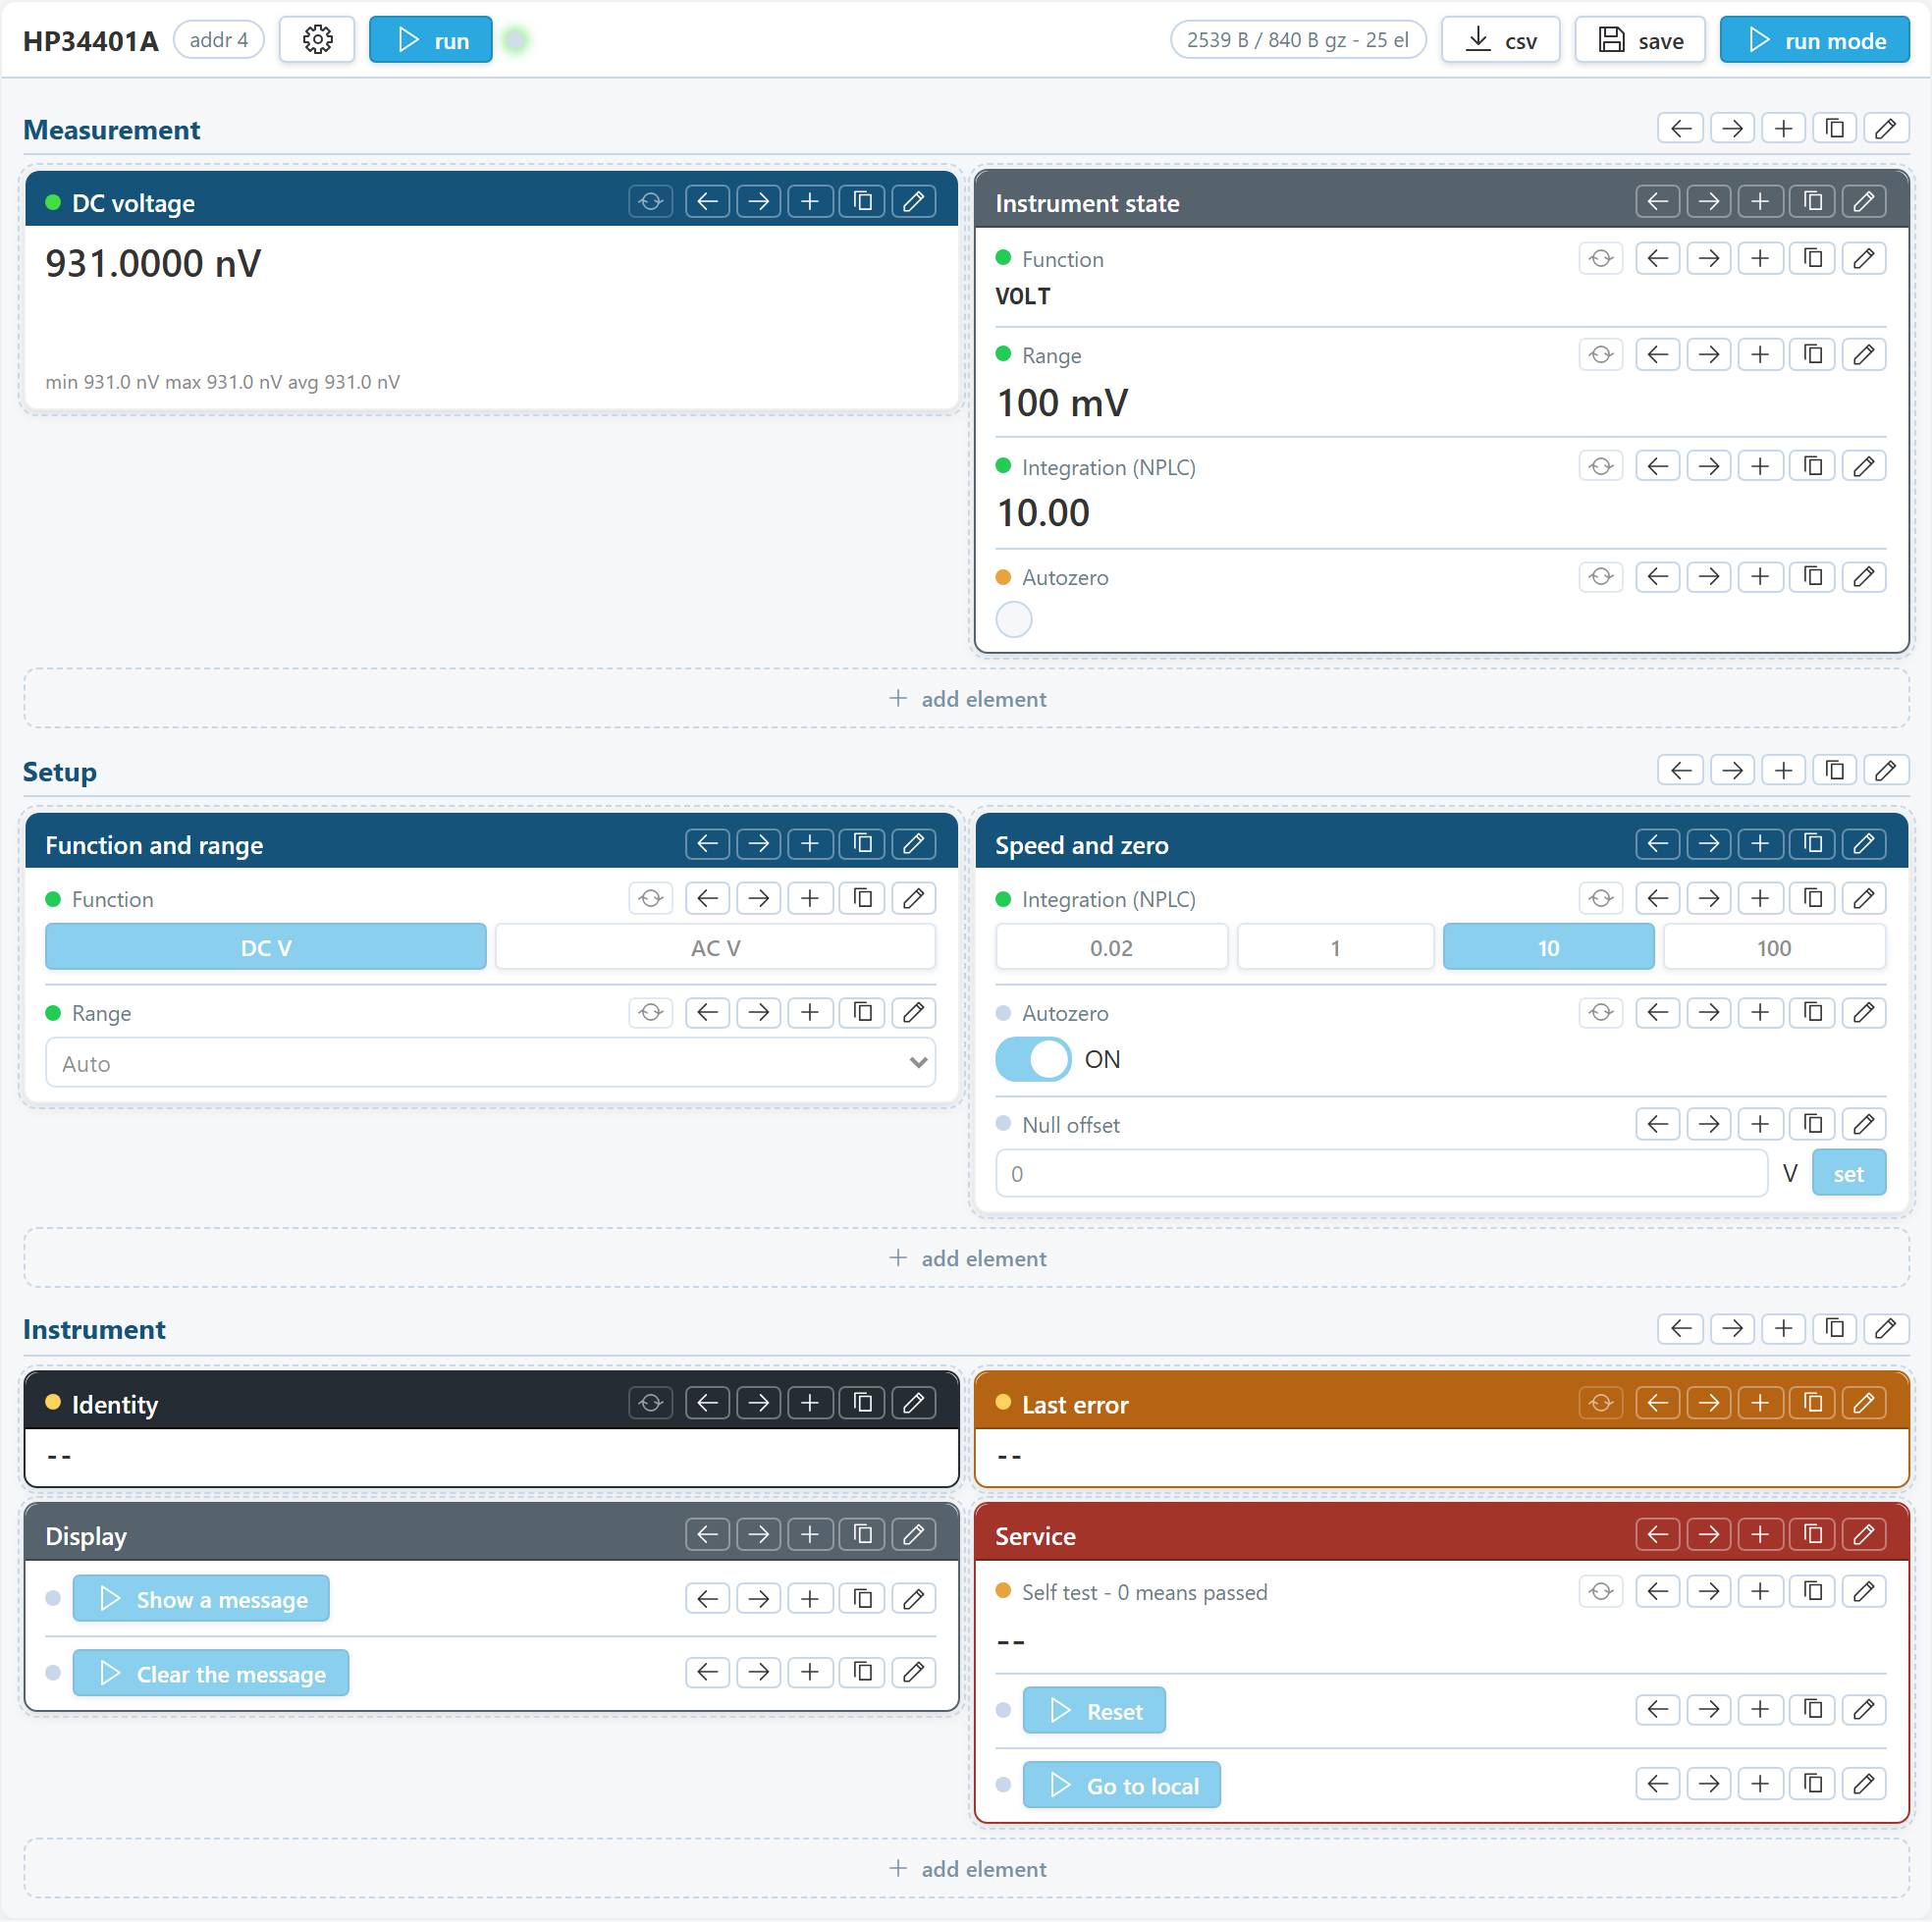
Every element of it, in order, so you can check your own against it:
| # | Label | Type | Settings | Commands | Poll |
|---|---|---|---|---|---|
| 1 | Measurement | Text / Section heading | – | heading only | – |
| 2 | DC voltage | Indicator / Number | width 2, sparkline, unit V, eng, 7 digits | Q READ? | every tick |
| 3 | Instrument state | Text / Section heading | width 2, grey | heading only | – |
| 4 | Function | Indicator / Number | in card above, text, regex "([A-Z:]+)" | Q FUNC? | every 4 |
| 5 | Range | Indicator / Number | in card above, unit V, eng, 3 digits | Q VOLT:DC:RANG? | every 4 |
| 6 | Integration (NPLC) | Indicator / Number | in card above, fix, 2 digits | Q VOLT:DC:NPLC? | every 4 |
| 7 | Autozero | Indicator / Lamp | in card above, lamp only, int, lit when non-zero | Q VOLT:DC:ZERO:AUTO? | every 4 |
| 8 | Setup | Text / Section heading | – | heading only | – |
| 9 | Function and range | Text / Section heading | width 2 | heading only | – |
| 10 | Function | Selector / Gang buttons | in card above, send on run | DC V → CONF:VOLT:DCAC V → CONF:VOLT:AC | – |
| 11 | Range | Selector / Combobox | in card above, send on run | Auto → VOLT:DC:RANG:AUTO ON100 mV → VOLT:DC:RANG 0.11 V → VOLT:DC:RANG 110 V → VOLT:DC:RANG 10100 V → VOLT:DC:RANG 1001000 V → VOLT:DC:RANG 1000 | – |
| 12 | Speed and zero | Text / Section heading | width 2 | heading only | – |
| 13 | Integration (NPLC) | Selector / Gang buttons | in card above, send on run, starts on option 3 | 0.02 → VOLT:DC:NPLC 0.021 → VOLT:DC:NPLC 110 → VOLT:DC:NPLC 10100 → VOLT:DC:NPLC 100 | – |
| 14 | Autozero | Selector / Switch | in card above, starts on option 2 | OFF → ZERO:AUTO OFFON → ZERO:AUTO ON | – |
| 15 | Null offset | Value entry / Number | in card above, unit V, default 0 | W CALC:NULL:OFFS ${v} | – |
| 16 | Instrument | Text / Section heading | – | heading only | – |
| 17 | Identity | Indicator / Text | width 2, black | Q *IDN? | manual |
| 18 | Last error | Indicator / Number | width 2, orange, text, regex "([^"]*)" | Q SYST:ERR? | manual |
| 19 | Display | Text / Section heading | width 2, grey | heading only | – |
| 20 | Show a message | Button / Button | in card above | W DISP:TEXT "GPIBEE BENCH" | – |
| 21 | Clear the message | Button / Button | in card above | W DISP:TEXT:CLE | – |
| 22 | Service | Text / Section heading | width 2, red | heading only | – |
| 23 | Self test - 0 means passed | Indicator / Number | in card above, int, alarm above 0.5 | Q *TST? @30000 | manual |
| 24 | Reset | Button / Button | in card above, confirm | W *RSTT 1500 | – |
| 25 | Go to local | Button / Button | in card above | A local | – |
You can build it from that table, or start from the finished file and change what you like:
⤓ Download HP34401A.gpibee — import it on the Benches page with import / restore. It is set to GPIB address 4; change it in the bench settings if yours differs.
Limitations
Benches deliberately stop where a real program starts. Knowing the edges saves you fighting them:
- The tick is best-effort, not a sample clock. A slow instrument slows the whole bench down — everything on the bus is strictly one operation at a time, in order. Fine for watching, wrong for timing-critical sampling.
- No conditional logic, no loops, no maths between elements. A command sequence is a straight line of steps. There is no "if the reading is above X, do Y", and one element cannot use another's value.
- A selector shows what was last pressed, not what the instrument is really set to — unless you add a readback indicator next to it, or tick send the shown selection when run is pressed.
- Storage is small, and smaller than it will be. Benches share a compact region in the device's flash. It is enough for a good handful of them, because they compress together well. During the beta the region is deliberately kept much smaller than it needs to be: the format is still moving, and a small region keeps the amount at risk small while that is true. Once the feature is final the region will be enlarged.
- One bench runs at a time. Switching benches, or leaving the page, stops the one that was running. This is on purpose: nothing should generate GPIB traffic in the background.
- Numbers, text and lamps — not waveforms. A bench displays scalars. Waveform and screen data can be downloaded as files, but they are not plotted in the browser.
Troubleshooting
| Problem | Solution |
|---|---|
A card shows -- and never updates |
Open its editor and press test. The raw reply and the hex dump tell you immediately whether the command was wrong, the address was wrong, or the reply arrived but could not be parsed. |
| The reading is a number, but always the same one | Check the poll every N ticks value — 0 means the element only reads when its refresh icon is pressed. |
| Every element times out | Wrong GPIB address, or the instrument needs a write termination. Try \n in the bench settings; some older instruments never see a command that is only EOI-terminated. |
The reply arrives but shows as -- |
The instrument is answering with letters around the number. Set Take value to last number in the Parse section. |
| Readings are one measurement behind, permanently | A query timed out at some point and left its answer in the instrument's output queue. A failing sequence now sends a Device Clear automatically to resynchronise; if it persists, the Device Clear bus action on a button clears it by hand. |
| The error card fills up with messages | Something is being polled that is not valid in the instrument's current mode. Give that element a poll divider of 0 so it only reads on demand, or move it to a separate bench for the mode where it does work. |
| "Bench storage is full" | Delete a bench you no longer need, or trim elements. The counter in the management card header shows what is used. The region is intentionally small during the beta and will be enlarged once the format is final, so this gets easier. |
Where next
The quickest way to get a feel for what else is possible is to read someone else's bench. The Benches page has ready-made ones to download and import, including instruments that predate SCPI, one that drives a scanner card, and a CMU200 that pulls a trace and a screenshot off the instrument as files. Import one, open its elements, and the command sequences are all there to read.
If you build a bench worth sharing, send it in through the contact and support page and it can go up there for everybody else with that instrument.